Wednesday, May 28, 2014

Running jenkins as a different user than "jenkins" for added security

On your EC2 instance if you have installed jenkins using pkg manager, then it possible to run jenkins process as a lesser privileged linux user other than "jenkins". You have to make the following changes in the system


  • Make the lesser privileged user own /var/lib/jenkins folder

$sudo chown -R <user>:<user> /var/lib/jenkins


  • Make the lesser privileged user own the jenkins logs folder so that is can write logs to it.
$sudo chown -R <user>:<user> /var/log/jenkins

  • Make the lesser privileged user own jenkins cache folder where the "war" is located
$sudo chown -R tdo:tdo /var/cache/jenkins

  • Edit sysconfig for jenkins in /etc/sysconfig/jenkins and edit JENKINS_USER="<user>"
  • Restart "jenkins" service
$sudo service jenkins restart
  • Confirm the process started successfully using "ps -ef |grep jenkins"


Monday, May 26, 2014

Installing Apache 2.4.9 httpd from source

Most often we install Apache httpd using pkg manager on the EC2 instances. However, on some situations, it may be necessary to install Apache httpd from source. It is better to pick the latest version of the below packages from Apache download site:-


  • Apache Portable Runtime (APR) version 15.1 - apr-1.5.1.tar.bz2
  • APR util version 1.5.3 - apr-util-1.5.3.tar.bz2
  • Perl Compatible Regular Expressions (PCRE) version 8.35 - pcre-8.35.tar.bz2
  • Apache httpd dependencies version 2.4.9 - httpd-2.4.9-deps.tar.bz2
  • Apache httpd 2.4.9 - httpd-2.4.9.tar.bz2
  • Update the EC2 instance with dependencies ($yum install gcc libxml2-devel gcc-c++ libicu-devel libxslt-devel bzip2 bzip2-devel libjpeg-devel libpng libpng-devel freetype freetype-devel curl curl-devel t1lib-devel unixODBC-devel openssl-devel openssl)
Copy all the src files into /usr/local/src folder and start installing the packages in the order below:-

APR installation:

*******
$cd /usr/local/src/
$tar xvjf apr-1.5.1.tar.bz2
$cd apr-1.5.1
$./configure --prefix=/usr/local/share/applications/apache2
$make
$make install
*******

APR Util installation:

*******
$cd /usr/local/src/
$tar xvjf apr-util-1.5.3.tar.bz2
$cd apr-util-1.5.3
$./configure --prefix=/usr/local/share/applications/apache2 --with-apr=/usr/local/share/applications/apache2
$make
$make install
*******

PCRE installation:

*******
$cd /usr/local/src/
$tar xvjf pcre-8.35.tar.bz2
$cd pcre-8.35
$./configure --prefix=/usr/local/share/applications/apache2
$make
$make install
*******

Apache httpd installation:

*******
$cd /usr/local/src/
$tar xvjf httpd-2.4.9-deps.tar.bz2 -C /usr/local/src/
$tar xvjf httpd-2.4.9.tar.bz2 -C /usr/local/src/
$./configure --prefix=/usr/local/share/applications/apache2 --with-apr=/usr/local/share/applications/apache2 --with-apr-util=/usr/local/share/applications/apache2 --with-pcre=/usr/local/share/applications/apache2 --with-ldap --enable-so --enable-auth-digest --enable-authz_owner --enable-log_config --enable-logio --enable-ext_filter --enable-mime_magic --enable-expires --enable-deflate --enable-headers --enable-usertrack --enable-dav --enable-info --enable-vhost_alias --enable-speling --enable-substitute --enable-rewrite --enable-proxy --enable-proxy_balancer --enable-proxy_ftp --enable-proxy_http --enable-proxy_ajp --enable-proxy_connect --enable-cache --enable-version --enable-ssl --enable-so
$make
$make install
*******

Next copy the attached httpd startup script (httpd) into /etc/init.d/ folder as root and give execute permissions on the script - 

-rwxr-xr-x. 1 root root  3462 Apr 29 20:07 httpd

You can also add httpd as service using "chkconfig"

$sudo chkconfig --add httpd
$sudo chkconfig --level 2345 httpd

Next you can try to bring up httpd process 

$sudo service httpd start

NOTE - Pl. change the user/group for httpd to run as a lesser privileged user (daemon/daemon)


Sunday, May 25, 2014

Installing Sonatype Nexus repository management

Sonatype nexus is available in open-source version as well as profession version. For our purposes, we will try the OSS version

First download the latest version from Sonatype download directory into /usr/local folder

**************
$ wget http://www.sonatype.org/downloads/nexus-latest-bundle.tar.gz
--2014-05-25 20:11:58--  http://www.sonatype.org/downloads/nexus-latest-bundle.tar.gz
Resolving www.sonatype.org... 207.223.241.84
Connecting to www.sonatype.org|207.223.241.84|:80... connected.
HTTP request sent, awaiting response... 301 Moved Permanently
Location: http://download.sonatype.com/nexus/oss/nexus-latest-bundle.tar.gz [following]
--2014-05-25 20:11:58--  http://download.sonatype.com/nexus/oss/nexus-latest-bundle.tar.gz
Resolving download.sonatype.com... 199.27.76.192, 199.27.78.192
Connecting to download.sonatype.com|199.27.76.192|:80... connected.
HTTP request sent, awaiting response... 302 Found
Location: http://download.sonatype.com/nexus/oss/nexus-2.8.0-05-bundle.tar.gz [following]
--2014-05-25 20:11:58--  http://download.sonatype.com/nexus/oss/nexus-2.8.0-05-bundle.tar.gz
Reusing existing connection to download.sonatype.com:80.
HTTP request sent, awaiting response... 200 OK
Length: 45566492 (43M) [application/octet-stream]
Saving to: “nexus-latest-bundle.tar.gz.1”

100%[======================================>] 45,566,492  60.8M/s   in 0.7s

2014-05-25 20:11:59 (60.8 MB/s) - “nexus-latest-bundle.tar.gz.1” saved [45566492/45566492]

**************

Next uncompress and untar the application in a folder of your choice, e.g., /usr/local/share/applications and copy "sonatype-work" folder into the root nexus folder. Navigate to $NEXUS_HOME/bin folder and start the application using "./nexus start". To confirm that the process started you can check
  • $ps -ef |grep nexus (to check if process is running in the process list)
  • $netstat -an |grep 8081 (to check if default connector port for nexus is in LISTENING state)
If your nexus application didn't startup correct, check the wrapper.log file under $NEXUS_HOME/logs folder. In case you see an error like below, it indicates you don't have the correct java version with which the application was compiled. 

**************
wrapper  | JVM exited while loading the application.
jvm 1    | Exception in thread "main" java.lang.UnsupportedClassVersionError: or
g/sonatype/nexus/bootstrap/jsw/JswLauncher : Unsupported major.minor version 51.
0
jvm 1    |      at java.lang.ClassLoader.defineClass1(Native Method)
jvm 1    |      at java.lang.ClassLoader.defineClass(ClassLoader.java:643)
jvm 1    |      at java.security.SecureClassLoader.defineClass(SecureClassLoader
.java:142)
jvm 1    |      at java.net.URLClassLoader.defineClass(URLClassLoader.java:277)
jvm 1    |      at java.net.URLClassLoader.access$000(URLClassLoader.java:73)
jvm 1    |      at java.net.URLClassLoader$1.run(URLClassLoader.java:212)
jvm 1    |      at java.security.AccessController.doPrivileged(Native Method)
jvm 1    |      at java.net.URLClassLoader.findClass(URLClassLoader.java:205)
jvm 1    |      at java.lang.ClassLoader.loadClass(ClassLoader.java:323)
jvm 1    |      at sun.misc.Launcher$AppClassLoader.loadClass(Launcher.java:294)
jvm 1    |      at java.lang.ClassLoader.loadClass(ClassLoader.java:268)
jvm 1    | Could not find the main class: org.sonatype.nexus.bootstrap.jsw.JswLa

**************

Install JDK 1.7.0 and set JAVA_HOME and restart nexus application.


Installing openjdk 1.7.0 on RHEL6.5 EC2 instance

To install openjdk instead of Oracle jdk, you can use pkg manager

$sudo yum install -y java-1.7.0-openjdk-devel

the pkg manager will install it under, /usr/lib/jvm/java-1.7.0, and you can set your JAVA_HOME variable in your $HOME/.bash_profile such as

JAVA_HOME=/usr/lib/jvm/java-1.7.0;export JAVA_HOME

Removing read/write/execute privilege on Apache htdocs

For security reasons, you want on the Apache httpd user to have read/write/execute privilege instead of its group users or other users.

$ls -l |grep htdocs
drwxr-xr-x.  6 apache apache  4096 May 23 22:28 htdocs

$chmod -R go-rwx htdocs

$ls -l |grep htdocs
drwx------.  6 apache apache  4096 May 23 22:28 htdocs

Uncompressing files with .bz2 or .tar.gz extension

Use tar command to uncompress any file with .tar.bz2 extension, such as

$tar xvfj pcre-8.35.tar.bz2 -C test

To uncompress files with .tar.gz extension you can use tar as well

$tar xvfz pcre-8.35.tar.gz -C test

To uncompress just a single .bz2 file, you can use "bzip" utility

$ bzip2 -d pcre-8.35.tar.bz2

Using "tar" to extract a .gz file to a particular folder

$ tar xvfz zabbix-2.2.3.tar.gz -C test
zabbix-2.2.3/
zabbix-2.2.3/Makefile.in
zabbix-2.2.3/misc/
zabbix-2.2.3/misc/Makefile.in
zabbix-2.2.3/misc/snmptrap/
zabbix-2.2.3/misc/snmptrap/zabbix_trap_receiver.pl
zabbix-2.2.3/misc/snmptrap/snmptrap.sh
zabbix-2.2.3/misc/images/
zabbix-2.2.3/misc/images/README
zabbix-2.2.3/misc/images/png_to_xml.sh
zabbix-2.2.3/misc/images/png_classic/
zabbix-2.2.3/misc/images/png_classic/Hub_small.png
zabbix-2.2.3/misc/images/png_classic/Server.png
zabbix-2.2.3/misc/images/png_classic/README
zabbix-2.2.3/misc/images/png_classic/Network_small.png
zabbix-2.2.3/misc/images/png_classic/Printer.png
zabbix-2.2.3/misc/images/png_classic/Notebook_small.png
zabbix-2.2.3/misc/images/png_classic/Router_small.png
.....

NOTE - If the folder "test" does not exist, then tar will throw an error, e.g.

$ tar xvfz zabbix-2.2.3.tar.gz -C test1
tar: test1: Cannot chdir: No such file or directory
tar: Error is not recoverable: exiting now

Using "jar" command to view the files inside a .jar file

$jar tvf nexus-bootstrap-2.8.0-05.jar
     0 Tue Apr 08 19:54:14 EDT 2014 META-INF/
   436 Tue Apr 08 19:54:12 EDT 2014 META-INF/MANIFEST.MF
     0 Tue Apr 08 19:54:12 EDT 2014 org/
     0 Tue Apr 08 19:54:12 EDT 2014 org/sonatype/
     0 Tue Apr 08 19:54:12 EDT 2014 org/sonatype/nexus/
     0 Tue Apr 08 19:54:12 EDT 2014 org/sonatype/nexus/bootstrap/
     0 Tue Apr 08 19:54:12 EDT 2014 org/sonatype/nexus/bootstrap/jetty/
     0 Tue Apr 08 19:54:12 EDT 2014 org/sonatype/nexus/bootstrap/monitor/
     0 Tue Apr 08 19:54:12 EDT 2014 org/sonatype/nexus/bootstrap/monitor/commands/
     0 Tue Apr 08 19:54:12 EDT 2014 org/sonatype/nexus/bootstrap/log/
     0 Tue Apr 08 19:54:12 EDT 2014 org/sonatype/nexus/bootstrap/jsw/
  2387 Tue Apr 08 19:54:12 EDT 2014 org/sonatype/nexus/bootstrap/EnvironmentVariables.class
  6164 Tue Apr 08 19:54:12 EDT 2014 org/sonatype/nexus/bootstrap/jetty/JettyServer.class
   ....

Using ec2metadata webservice to get more information about your running EC2 instance

It is recommended to install ec2metadata script in each of your instance that you launch so that you can get information about the instance if needed using SSH commands. You can get more information in AWS documentation link - ec2metadata

The bash script will give output like below:
**************
$ ./ec2-metadata
ami-id: ami-xxxx
ami-launch-index: 0
ami-manifest-path: (unknown)
ancestor-ami-ids: not available
block-device-mapping:
         ami: /dev/sda1
         root: /dev/sda1
instance-id: i-xxxx
instance-type: m3.large
local-hostname: ip-10-187-x-x.ec2.internal
local-ipv4: 10.187.x.x
kernel-id: aki-1ecebd
placement: us-east-1a
product-codes: not available
public-hostname: ec2-54-234-x-x.compute-1.amazonaws.com
public-ipv4: 54.234.x.x
public-keys:
keyname:test
index:0
format:openssh-key
key:(begins from next line)
ssh-rsa AAAA...VzIzBEfObTbXF4IUdnqe/ test
ramdisk-id: not available
reservation-id: r-ba6cabc
security-groups: test
user-data: not available
**************

You can download the script from Amazon url - ec2metadata download

The above script makes a call from within the instance to an Amazon web service at the below url:-

http://169.254.169.254/latest/meta-data/

Friday, May 23, 2014

Apache mod_proxy DNS caching issues with Route53 DNS

In your architecture if you are using Amazon Route53 DNS A record pointing to ELB and if you are using ProxyPass in Apache httpd to proxy some requests, you may frequently notice timeout errors until you restart httpd process.

httpd error_log will show errors like:

**************
[Fri May 23 12:54:07.751116 2014] [proxy:error] [pid 14385:tid 140341946558208]
(70007)The timeout specified has expired: AH00957: HTTP: attempt to connect to <public ip of ELB>:<port> (<DNS name>) failed
[Fri May 23 12:54:07.751168 2014] [proxy:error] [pid 14385:tid 140341946558208] AH00959: ap_proxy_connect_backend disabling worker for (<DNS name>) for 60s
[Fri May 23 12:54:07.751180 2014] [proxy_http:error] [pid 14385:tid 140341946558208] [client <private ip>:11314] AH01114: HTTP: failed to make connection to backend: <DNS name>, referer: http://<DNS name>/index.php
**************

To confirm that ELB's public ip has changed, you can run "dig" command

**************
; <<>> DiG 9.7.1 <<>> <DNS Name>
;; global options: +cmd
;; Got answer:
;; ->>HEADER<<- opcode: QUERY, status: NOERROR, id: 20971
;; flags: qr rd ra; QUERY: 1, ANSWER: 1, AUTHORITY: 0, ADDITIONAL: 0

;; QUESTION SECTION:
;<DNS Name>. IN   A

;; ANSWER SECTION:
<DNS Name>. 60 IN A       <public ip addr of ELB>

;; Query time: 63 msec
;; SERVER: 
;; WHEN: Fri May 23 09:56:36 2014
;; MSG SIZE  rcvd: 66
**************

As per Amazon support, the public ip of ELB's can change under below conditions:-

  1. Scale up/down. When there is considerable change in the load ELB will scale Up or down to best serve the traffic.
  2. ELB replacement. When the ELB has to be replaced or upgraded due to an issue.
To circumvent the caching issues, you can try using ec2 instance name instead of DNS name or proxy to "localhost". Additionally, you can try setting TTL value for mod_proxy as suggested in


Example

ProxyPass /example http://backend.example.com max=20 ttl=60 disablereuse=On

"ttl=60" should set the time to live for inactive connections and associated connection pool entries, in seconds, so once reaching this limit, a connection will not be used again.

"DisableReuse On" is good when backends themselves may be under round-robin DNS which is true for the ELB.

Tuesday, May 20, 2014

Quirks in making an already running RDS instance "internet accessible"

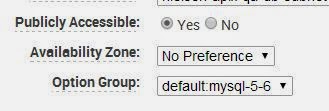
If you have already running RDS instance within VPC and you have a new requirement to allow access to the RDS instance from an EC2 instance running outside the VPC, then you would have to jump through the below hoops to make the instance "publicly accessible'.


  • First you would need to take a DB snapshot of the running RDS instance.
  • Next restore the DB from snapshot and give a new instance identifier. Make sure the "publicly accessible" radio button is checked

  •  Once the DB instance has been spun up, you will next need to "modify" the instance and add it to the appropriate DB security group. DB restore from snapshot will by default add the instance to the "default" security group
  •  After you have modified the security group of the newly spun up instance, you will have to modify your old RDS instance and give it a new name. 
  • Next you will have to modify your new instance and assign the old name (the one that your original running instance had) to the new instance. Make sure to check the small check box in the RDS screen to "Apply immediately".

Sunday, May 18, 2014

"Broken pipe" error when trying to ssh into an EC2 instance


Sometimes you may see a broken pipe error when trying to ssh into an ec2 instance. It is possible that there is some form of resource starvation happening on that machine which is causing the SSH daemon from accepting new connections

$ ssh -i key.pem ec2-user@<ec2 instance ip> Write failed: Broken pipe
You can try either an instance reboot and if that doesn't work, you will have to detach the root volume from this instance and attach it to another healthy running instance to look at /etc/ssh/sshd_config file.

Friday, May 16, 2014

Adding URI prefix to Jenkins to enable ProxyPass redirection in Apache httpd

When you install jenkins using the package manager, JENKINS_HOME is set to /var/lib/jenkins and the default configuration under /etc/sysconfig/jenkins does not contain an URI prefix such as http://<url>/<uri>. Typically, you would to add an uri like "/jenkins" to allow proxying from Apache httpd running on the same server. To add the prefix and allow for Proxying in httpd, make the below changes

$ sudo vi /etc/sysconfig/jenkins
JENKINS_ARGS="--prefix=/jenkins"

$ sudo service jenkins restart

Once you restart, your jenkins landing page will appear only when you enter http://<ec2 instance>/jenkins

Next, you would need to edit your $APACHE_HOME/conf/httpd.conf file and make the below changes

$sudo vi httpd.conf (and add the below lines at the end of the file)
ProxyPass        /jenkins http://localhost:8080/jenkins
ProxyPassReverse /jenkins http://localhost:8080/jenkins

Note - Pl. be sure that below load modules are uncommented

*****************
LoadModule proxy_module modules/mod_proxy.so
LoadModule proxy_connect_module modules/mod_proxy_connect.so
LoadModule proxy_ftp_module modules/mod_proxy_ftp.so
LoadModule proxy_http_module modules/mod_proxy_http.so
LoadModule proxy_fcgi_module modules/mod_proxy_fcgi.so
LoadModule proxy_scgi_module modules/mod_proxy_scgi.so
LoadModule proxy_wstunnel_module modules/mod_proxy_wstunnel.so
LoadModule proxy_ajp_module modules/mod_proxy_ajp.so
LoadModule proxy_balancer_module modules/mod_proxy_balancer.so
LoadModule proxy_express_module modules/mod_proxy_express.so
*****************

Installing Ruby, Jekyll, NodeJS on EC2 instance the easy way

If you are installing Ruby, Rubygems, Jekyll and Node.js on your EC2 instance, it would be best to use RVM (Ruby Version Manager)

$sudo curl -sSL https://get.rvm.io | bash -s stable --ruby=2.1.1
$rvm install 2.1.1
$rvm use 2.1.1

Once you have Ruby installed, you can install Rubygems using rvm

$sudo rvm rubygems latest

After you have install rubygems, you can use "gem install" to install Jekyll

$sudo gem install jekyll

To test whether jekyll was installed successfully, type $jekyll in the terminal to see if you get a help menu.

Next to install Node.js, you can run your OS package manager

$sudo yum install -y nodejs npm

and after installation type $node should take you into node's shell.

Wednesday, May 14, 2014

In your VPC if you have ICMP protocol disabled, you can still test connections between your public and private subnets using tcpdump and netcat utilities

If you are troubleshooting connection issues among the instances within your VPC between public and private subnets you could use tcpdump and netcat utilities.

You can set up a listen port on ip address such as 8.8.8.8 using tcpdump:-

$ sudo tcpdump -nei any host 8.8.8.8
tcpdump: verbose output suppressed, use -v or -vv for full protocol decode
listening on any, link-type LINUX_SLL (Linux cooked), capture size 65535 bytes
x:44:42.136491 Out 0a:2b:97:62:61:e6 ethertype IPv4 (0x0800), length 68: 10.98.x.x.60362 > 8.8.8.8.http: Flags [S], seq 2892799385, win 17922, options [mss 8961,nop,nop,sackOK,nop,wscale 7], length 0
17:44:43.135965 Out 0a:2b:97:62:61:e6 ethertype IPv4 (0x0800), length 68: 10.98.x.x.60362 > 8.8.8.8.http: Flags [S], seq 2892799385, win 17922, options [mss 89
61,nop,nop,sackOK,nop,wscale 7], length 0

From your other subnet, you can use netcat to post some packets:

$ nc 8.8.8.8 80
POST / HTTP/1.1

you will notice that your tcpdump is now receiving those packets if the route tables have been set up correctly.

Tuesday, May 13, 2014

Quick way to truncate large tables (GB in size) in MySQL

When using InnoDB engine in MySQL, the truncates can be really slow especially if they have several gigs of data in recordsets

mysql>CREATE TABLE `NEW_TABLE` LIKE `OLD_TABLE`;
mysql>RENAME TABLE `OLD_TABLE` TO `OLD_TABLE_RENAMED`, `NEW_TABLE` TO `OLD_TABLE`;
mysql>DROP TABLE `OLD_TABLE_RENAMED`;

Sunday, May 11, 2014

Installing 32 bit glibc on 64 bit linux OS

When you are trying to start your applications, it is possible that you encounter a startup error in your applications that require native library support. It could be because you don't have 32 bit glibc package installed on your 64 bit OS. Things to confirm,


  • Confirm if your system is indeed running 64 bit OS

$ uname -a
Linux ip-10-98-0-41 2.6.32-431.11.2.el6.x86_64 #1 SMP Mon Mar 3 13:32:45 EST 201
4 x86_64 x86_64 x86_64 GNU/Linux

  • Confirm the distribution version
$ cat /etc/system-release
Red Hat Enterprise Linux Server release 6.5 (Santiago)

  • Confirm the glibc version installed
$ sudo yum list installed glibc
Loaded plugins: amazon-id, rhui-lb, security
Installed Packages
glibc.x86_64          2.12-1.132.el6           @rhui-REGION-rhel-server-releases

  • Once you have confirmed that you don't have 32 bit glibc installed, you can install it using package manager specific to your OS
$ sudo yum install -y glibc.i686

  • Once 32 bit glibc package has been installed, you can confirm by running "yum list installed"  again
$ sudo yum list installed glibc
Loaded plugins: amazon-id, rhui-lb, security
Installed Packages
glibc.i686            2.12-1.132.el6           @rhui-REGION-rhel-server-releases
glibc.x86_64          2.12-1.132.el6           @rhui-REGION-rhel-server-releases


Friday, May 9, 2014

How to determine if your Amazon EC2 image has PV-GRUB bootloader?

If you would like to load a custom kernel in your Amazon linux instance, you will need an Amazon modified version of bootloader called PV-GRUB (1.04 or higher). Typically, you can determine that by running a set of AWS CLI commands

$aws ec2 describe-instances --instance-id <i-xxxxx> --profile <your profile>
{
    "Reservations": [
        {
            "OwnerId": "",
            "ReservationId": "",
            "Groups": [],
            "Instances": [
                {
                    "Monitoring": {
                        "State": "disabled"
                    },
                   ....
                   ....
                    "Architecture": "x86_64",
                    "KernelId": "aki-1eceaf77",
                    "IamInstanceProfile": {
                        "Id": "",
                        "Arn": ""
                    },
                    "RootDeviceName": "/dev/sda1",
                    "VirtualizationType": "paravirtual",
                    "Tags": [
                       ...
                    "AmiLaunchIndex": 0
                }
            ]
        }
    ]
}

$aws ec2 describe-images --image-ids <aki-xxxx> --profile <your profile>
{
    "Images": [
        {
            "VirtualizationType": "paravirtual",
            "Name": "pv-grub-hd0_1.04-i386.gz",
            "Hypervisor": "xen",
            "ImageOwnerAlias": "amazon",
            "ImageId": "aki-xxxx",
            "State": "available",
            "BlockDeviceMappings": [],
            "Architecture": "i386",
            "ImageLocation": "amzn-ami-us-east-1/pv-grub-hd0_1.04-i386.gz.manifest.xml",
            "RootDeviceType": "instance-store",
            "OwnerId": "",
            "Public": true,
            "ImageType": "kernel",
            "Description": "PV-GRUB release 1.04, 32-bit, configured for (hd0)/boot/grub/menu.lst"
        }
    ]
}

Wednesday, May 7, 2014

In a VPC, if you are unable to connect to internet through NAT from your instances in private subnet check the Route table and security group configuration

If you have a simple VPC with 1 public and 1 private subnet and you are able to connect to internet from ec2 instances running in your public subnet but not your private subnet instances, then check the following:-


  • Check your NAT instance to see if "source/destination" check is disabled


  • Check to see if your VPC route tables have been created correctly with main route table not being explicitly associated with a subnet

  • Check to see if your secondary route table has association with the internet gateway (igw-*) and is shown as "Active"

  • Check to see if your secondary route table has "subnet association" to the public subnet CIDR as you have defined when you created the VPC

NOTE - If you need the instances in your private subnet to use IGW instead of NAT for outbound traffic, then you will need to add your private subnet to this "subnet association" table above. e.g. (10.98.1.0/24). 

  • Once all of the above have been checked, then most likely it an ingress port issue on your NAT instance's security group. You have to make sure to add the private subnet(s) CIDR in the "inbound" port rules of your NAT instance security group (assuming your NAT instance is not part of "default" VPC security group)

NOTE - In future if you add additional subnets to your VPC, you will have to explicitly add the CIDR block of the new subnet in the ingress security rules of the NAT sg. You may also add the entire CIDR block of the VPC if you want to automatically add all subnets to connect through NAT instance.

Running a simple telnet could confirm whether you now have access to internet after making the above changes.


On RHEL, sometimes you get the error when running yum - ""Another app is currently holding the yum lock; waiting for it to exit..."

This error could be because some previous yum command did not complete or has been stopped. In which case, you have to find the pid of that "defunct" process. To do that you can do

$ps aux |grep yum
root      2510  0.0  0.0 175512  2660 pts/0    T    21:13   0:00 sudo yum list mysql
root      2511  0.0  0.0      0     0 pts/0    Z    21:13   0:00 [yum] <defunct>
root      2561  0.0  0.0 175512  2656 pts/0    T    21:20   0:00 sudo yum list mysql
root      2562  0.3  0.2 313968 20388 pts/0    T    21:20   0:00 /usr/bin/python /usr/bin/yum list mysql
tdo       2566  0.0  0.0 103252   824 pts/0    S+   21:21   0:00 grep yum

You would have to remove the lock associated with that lock held by that pid first

$sudo rm -f /var/run/yum.pid 2511

Once you kill the lock, you can kill the defunct process using "kill"

$sudo kill -9 2511

and then you should be able to run yum again.


Tuesday, May 6, 2014

Deleting a VPC sometimes fails because of dependencies

Recently, I was trying to delete a VPC both through console and through awscli and encountered failure because some dependency. The awscli was throwing the error below:-

$aws ec2 delete-vpc --vpc-id <vpc-id> --profile <profile-name> --debug --region us-east-1
2014-05-06 14:24:30,107 - awscli.clidriver - DEBUG - CLI version: aws-cli/1.3.8 Python/2.7.3 Windows/7, botocore version: 0.42.0
2014-05-06 14:24:30,108 - botocore.service - DEBUG - Creating service object for: ec2
2014-05-06 14:24:30,216 - botocore.hooks - DEBUG - Event service-data-loaded.ec2: calling handler <function signature_overrides at 0x0286C630>
2014-05-06 14:24:30,216 - botocore.hooks - DEBUG - Event service-created: calling handler <function register_retries_for_service at 0x0286C530>
....
ClientError: A client error (DependencyViolation) occurred when calling the DeleteVpc operation: The vpc 'vpc-xxxx' has dependencies and cannot be deleted.
2014-05-06 14:24:32,667 - awscli.clidriver - DEBUG - Exiting with rc 255

A client error (DependencyViolation) occurred when calling the DeleteVpc operation: The vpc 'vpc-xxxx' has dependencies and cannot be deleted.

The error message simply says that there is a dependency but doesn't state what the dependency is. If it were a subnet, network acl, RDS instance still connected to VPC, it is easy to determine through the console. However, the network interface is shown only in the "EC2" page rather than VPC page. From the AWS console, you can go to EC2->Network Interfaces to see if there are any eni-* that is still present. If present, you can delete it from the console or from the awscli like

$aws ec2 delete-network-interface --network-interface-id eni-xxxx --profile <profile-name> --debug --region us-east-1
2014-05-06 15:09:57,334 - awscli.clidriver - DEBUG - CLI version: aws-cli/1.3.8 Python/2.7.3 Windows/7, botocore version: 0.42.0
2014-05-06 15:09:57,335 - botocore.service - DEBUG - Creating service object for: ec2
2014-05-06 15:09:57,421 - botocore.hooks - DEBUG - Event service-data-loaded.ec2: calling handler <function signature_overrides at 0x02902630>
2014-05-06 15:09:57,423 - botocore.hooks - DEBUG - Event service-created: calling handler <function register_retries_for_service at 0x02902530>
....
2014-05-06 15:10:00,976 - awscli.formatter - DEBUG - RequestId: 7a23cfd5-4c40-4797-8bd7-5902a6a7f309
{
    "return": "true"
}

Once you delete the unused eni-*, you can now run the "delete-vpc" command to get rid of the unused VPC.

Monday, May 5, 2014

OnDemand vs Reserved Instance pricing of EC2 instances

If you are considering purchasing reserved EC2 instances for your project, you should first consider whether you will need a light utilization, medium utilization or heavy utilization machines. Once you decide on the type of utilization, you have to consider the region of availability. Easy to compare the pricing is freely available from PromptCloud -

ec2-ondemand-vs-reserved-instance-pricing

Thursday, May 1, 2014

Getting public X509 certificates from Amazon SES SMTP server

Using openssl "s_client" command to get the certificates that is needed to import into SSL truststore in your java application

$openssl s_client -connect email-smtp.us-east-1.amazonaws.com:587 -showcerts -crlf -starttls smtp